Let's send money with XRP | Introduction to JavaScript
Create Script
Section titled “Create Script”-
Create a new file named
send_xrp.jsin your project directory. -
Paste the following code into
send_xrp.js.const xrpl = require('xrpl');async function main() {// Connect to Testnet serverconst client = new xrpl.Client('wss://s.altnet.rippletest.net:51233');await client.connect();// Set wallet information for remittance// This is a sample, be careful when using real private keysconst sender = xrpl.Wallet.fromSeed('your_wallet_seed_here');// Set the recipient address and remittance amountconst recipient = 'recipient_address_here';const amount = '100'; // 100XRP : Amount of XRP to send// prepare for transactionconst prepared = await client.autofill({TransactionType: 'Payment',Account: sender.address,Amount: xrpl.xrpToDrops(amount), // convert XRP to DropsDestination: recipient,});console.log('Prepared transaction:', prepared);// Sign the transactionconst signed = sender.sign(prepared);console.log('Signed transaction:', signed);// Send transactionconst result = await client.submitAndWait(signed.tx_blob);console.log('Transaction result:', result); // close connection// close the connectionclient.disconnect();}main().catch(console.error);- In
your_wallet_seed_here, enter the secret key of the source address of the test net. - In
recipient_address_here, enter the destination address of the testnet.
- In
Run Script
Section titled “Run Script”-
Run the script by executing the following command on the command line.
Terminal window node send_xrp.jsIf successful, you will see the following in the console.
Terminal window Prepared transaction: {TransactionType: 'Payment', Account: 'r2UUsk6CLuLSDLYLYAccount: 'r2UUsk6CLuLSDLYi5yhswa378tQ9cGLQW',Amount: '100000000', DestinationDestination: 'rHjHkeRJ7PMQXbghGKYL9NkTvksoixkojV',Flags: 0,NetworkID: undefined, Sequence: 230386, Sequence: 0, Sequence: 0, Sequence: 0Sequence: 230386,Fee: '12',LastLedgerSequence: 230412}Signed transaction: {tx_blob: '1200002200000000000024000383F2201B0003840C614000000005F5E100684000000000000000000C7321ED4CA842EEAEF0676AE4DEA3E1ACFDB4C5EFBDC 2034091627BF4BE1EE3683C948374408E6DEA70D583884639692A69CF0D76CC30FE368C41967B87FA5E717462F1F768DFE6205A285747963F52D7A61AAB77F09A 967E9459C6770543ED1CF233EF8D0481140647116D6E951B75A250510595C2E2772F56584A8314B781779BC48D6A07B5685B1D2EBE7AE0F0B7B2EF',hash: '1E33DACD3868BE78F67B89D4A68914E139CBAB17078A15BE2210FBA2D952F30D'}Transaction result: {id: 12,result: {Account: 'r2UUsk6CLuLSDLYi5yhswa378tQ9cGLQW',Amount: '100000000', DeliverMaxDeliverMax: '100000000', DestinationDestination: 'rHjHkeRJ7PMQXbghGKYL9NkTvksoixkojV',Fee: '12', Flags: 0,Flags: 0,LastLedgerSequence: 230412,Sequence: 230386,SigningPubKey: 'ED4CA842EEAEF0676AE4DEA3E1ACFDB4C5EFBDC2034091627BF4BE1EE3683C9483',TransactionType: 'Payment',TxnSignature: '8E6DEA70D583884639692A69CF0D76CC30FE368C41967B87FA5E717462F1F768DFE6205A285747963F52D7A61AAB77F09A967E9459C6770543ED 1CF233EF8D04',.date: 767641940,hash: '1E33DACD3868BE78F67B89D4A68914E139CBAB17078A15BE2210FBA2D952F30D', ctid: 'C00383FA00860001', date: 767641940, inLedger: 230394inLedger: 230394,ledger_index: 230394,meta: {AffectedNodes: [Array],TransactionResult: 'tecUNFUNDED_PAYMENT'},validated: true},type: 'response'} -
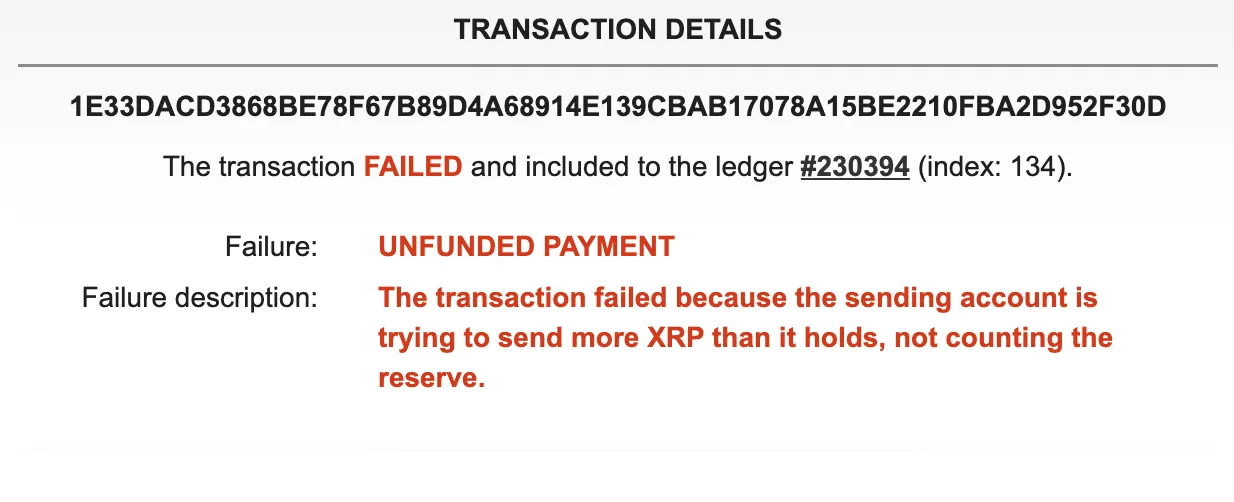
Search for the displayed hash value
1E33DACD3868BE78F67B89D4A68914E139CBAB17078A15BE2210FBA2D952F30Din explorer on the testnet search.Then…you will see
UNFUNDED PAYMENT, which means that the transmission has failed.
Actually, you can check the result based on the value of the
TransactionResultfield displayed in the console! You should seeTransactionResult: 'tecUNFUNDED_PAYMENT'in above.The address to which you sent this transaction has been issued 100 XRP by the Faucet tool, but the actual available balance is the amount minus 10 XRP which is used as a reserve(about 90 XRP). Also, please keep in mind that even a 90XRP transfer can fail because a fee must be paid at the time of transaction. Thus transactions are strictly verified.
-
Next, change the source of
send_xrp.jstoconst amount = '50';and then try running thenode send_xrp.jscommand.Terminal window Transaction result: {id: 12,result: {Account: 'r2UUsk6CLuLSDLYi5yhswa378tQ9cGLQW',Amount: '50000000', DeliverMaxDeliverMax: '50000000', DestinationDestination: 'rHjHkeRJ7PMQXbghGKYL9NkTvksoixkojV',Fee: '12', Flags: 0, Destination.Flags: 0,.LastLedgerSequence: 230757,LastLedgerSequence: 230757, Sequence: 230387,SigningPubKey: 'ED4CA842EEAEF0676AE4DEA3E1ACFDB4C5EFBDC2034091627BF4BE1EE3683C9483',TransactionType: 'Payment',TxnSignature: '7998B34A2A0B574A878D7E3F2B852C2ACD0D752544AD77670242F9B27524949F45AF64BEFAA0296566CEAFCD6404E65347C2E8CAFA010A691B38 F2736769A90A',.ctid: 'C003855300000001',date: 767643022,.inLedger: 230739,ledger_index: 230739,meta: {AffectedNodes: [Array],TransactionIndex: 0,TransactionResult: 'tesSUCCESS',delivered_amount: '50000000'},validated: true},}This time, the response is
TransactionResult: 'tesSUCCESS', confirming that the money transfer was successful.
Conclusion
Section titled “Conclusion”We hope you have found that you can easily transfer XRP by using xrpl.js, the client library.
Basically, the method of sending a transaction is the same as the others, and a trust line can be implemented by changing TransactionType: 'Payment' to a different TransactionType, which is TrustSet.
As such, the way how public blockchain can be used by ordinary web developers and beginners is one of the strengths of the XRPL ecosystem.
